Sunday, April 10, 2011

I'm still alive, I've just been eating granola

So, over the holidays (yes, I realize this was 4-5 months ago) I made two different kinds of granola for friends and family. It was so well-received that it's about time I shared the recipe(s) with the world. This actually came up on a long run with my good friend, Melody, who also loves cooking & baking. Here's to you, Mel :-)...

Holiday Granola:
6c. rolled oats (not instant)
1T cinnamon
1c. sliced almonds
1c. shelled pistachios
1c. flaked unsweetened coconut (I love the organic kind Whole Foods sells)
1c. raw shelled sunflower seeds
1/2c. raw shelled pumpkin seeds
1c. brown (or golden) flax seeds
*Salt to taste (sea or kosher -- not iodized/table)
*1t nutmeg

2/3c. canola oil
1/2c. maple syrup
1/2c. honey
1t. vanilla extract
1t. almond extract

* = Add to taste. If you use unsalted nuts, it helps to add a little salt to the dry ingredients. Also, if you like to double down on the nutty and holiday-esque flavor of the granola, I suggest adding a bit of nutmeg here as well. You can always add more at the end, when you remove the granola from the oven, so no need to be heavy handed with the salt/nutmeg before baking.

For the Tart version:
Add dried cherries, cranberries, raisins (I like to mix both golden and regular)

For the Tropical version:
Add chopped, dried papaya and pineapple

Method:
1. Preheat oven to 350 degrees. Line a baking sheet with parchment and spray with non-stick spray (if desired).
2. Combine all dry ingredients in a large bowl. Mix well with a spoon.
3. Combine the wet ingredients in a medium pot on the stove. Cook until warm and all ingredients are combined.
4. Add wet ingredients to dry ingredients -- mix well with a spoon. Try to work quickly here before the wet ingredients cool. Once combined, pour out on a parchment-lined baking sheet (I love my standard half-sheet jelly roll pan). Make sure the mixture is evenly disbursed on the pan to ensure even baking -- it will be about an inch thick layer.
5. Bake until golden brown, check every 10 minutes. Feel free to poke and turn the mixture while baking. It will not harden until it cools, so don't worry if it's soft when you remove it from the oven.
6. Let cool at least 30 mins. (it usually takes about an hour). Break up with your hands or a spatula and place it a very large bowl. Add as much of the fruits above as you like (I usually use about a cup of each). Mix to combine.

And you're done!
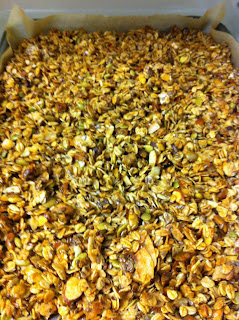
The granola when it comes out of the oven


The finished product: Tart Granola
Friday, January 22, 2010

Recent Bakes

Below are photos of some of my recent baking endeavors. The Graham Cracker recipe is coming soon!


Brown Sugar Dulce de Leche Sandwiches


Brown Sugar Cups filled with Dulce de Leche; Brown Sugar Cookies


Brown Sugar Cookies


Homemade Cinnamon Graham Crackers

More Cake Pop Photos -- Holiday Style

I whipped up some cake pops for a holiday party last month. I did white chocolate with gingersnaps, white chocolate with crushed all-natural candy canes, dark chocolate with sweetened coconut, dark/white with organic sugars and some plain white chocolate with a dark chocolate drizzle. I wish I had a better camera...


Friday, November 20, 2009

Cake Popsicles!

I owe a huge thank you to The Kitchn and Bakerella -- 2 amazing bakers, one whose emails keep me salivating, and the other whose tweets and blog inspire and impress me.

Once I discovered these "Cake Pops," I knew I had to make them immediately. I wasn't even going to try to replicate the works of art Bakerella so arduously creates in her kitchen (Sheep pops! Hello Kitty pops!! I mean, WOW). I also had the perfect excuse -- the belated birthday of my good friend, Val.

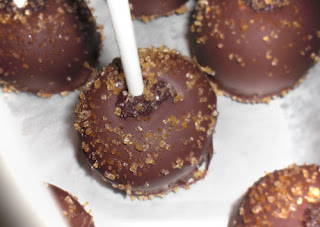
Val loves chocolate, so I decided to whip up a batch of my famous devil's food cake. Once cooled, I crumbled it up and added a buttercream-eque filling and rolled the dough into balls. After inserting some paper sticks and chilling the bare pops, I dipped them in some high quality semi-sweet Guittard chocolate and topped them with some Turbinado sugar. They came out spectacular, albeit quite rich. But who doesn't love a little taste of heaven now and then, right?!

Here are some pics of the delicious treats (I wish I had a better camera...):


Monday, September 28, 2009

"Dalmation" Brownies -- For Humans Only


For my good friend's (who also happens to be my awesome boss) birthday this year, I decided to reverse the brownie and add some flair. Now, I am not talking about a typical Blondie here. I'm talking about using high-quality white chocolate instead of semi-sweet chocolate as the base for these brownies. And instead of a creamy-smooth inside, I wanted to add some flavor and texture contrast. What better way to do that than to throw in some dark and milk chocolate chunks. I thought a little about the appearance of these beauties and I realized that they reminded me of a Dalmation's coat -- white with dark spots. And the "Dalmation" Brownies were born.

The base for this recipe comes from a recent King Arthur Flour catalog I got in the mail. I did change a few things, but you knew that... because that's how I roll.

They came out deliciously moist and super sweet. The nutmeg addition adds that special "je ne sais quoi" that I love to have in everything that I bake. The one thing I would watch for here is baking time. I had to cover the pan with foil for the second half of the baking time, as I didn't want to brown the top edges too much, but wanted the center to fully bake. Keep an eye on these brownies, though, because baking time may vary. Mine took about an hour, but my oven is wack... so they may take anywhere from 30 - 45 minutes in a fully-functional oven :-).

Enjoy!


"Dalamation" Brownies (White Chocolate Brownies with Dark & Milk Chocolate Chunks)
(makes about 16 small brownies)

1 cup chopped or chunks of white chocolate (I like Guittard or Scharffen Berger here)
1/4 cup (2 oz. or 1/2 stick) butter
3/4 cup sugar
1 T vanilla extract
1 tsp. kosher salt
1/4 tsp. nutmeg
2 large eggs
1/2 tsp. baking powder
1 1/4 cups AP flour
~1 cup milk chocolate chunks/chips
~1 cup semi/bitter sweet chunks/chips

Method:
  1. Preheat oven to 350 degrees. Grease 8 or 9 inch square baking pan. Set aside.
  2. Place the white chocolate, butter and sugar in a metal bowl set over simmering water. Once the butten has melted and the chocolate gets soft, remove the bowl from the pan of simmering water (wiping the moisture from the bottom). Add the salt, nutmeg and vanilla.Whisk until smooth and set a aside to cool until it's lukewarm.
  3. Beat the eggs in the bowl of your stand mixer until airy, light and fluffy. Slowly beat in the wet ingredients. In a separate bowl, whisk the flour and baking powder together. Slowly add to the egg & chocolate mixture.
  4. Mix in the chocolate chunks/chips until just combined. Pour/spoon the batter into the greased baking pan and bake for about 45 minutes. Check at 30 minutes, just to be sure. It may take up to an hour, but cover with aluminum foil for the last 15-30 mins to avoid overbrowning the top -- so that the stubborn middle cooks all the way through.
Source: Adapted from King Arthur Flour

Tuesday, September 15, 2009

Devil's Food Belongs in Heaven


For a friends birthday, I whipped up some amazing Devil's Food Cupcakes with Peanut Butter Cream Cheese Frosting. I'm not going to lie, I think these are the best cupcakes I've ever made.

Although I like frosting on my cupcakes, I do not like too much -- it's a fine line, I know. But I really hate it when a cupcake is all super sugary frosting -- you don't get to taste the actual cake! (In this case, the cake is too good to miss!). The cream cheese-based frosting I used here doesn't have too much sugar because I wanted to keep a little of that tang. You get a strong peanut butter punch, followed by that delicious cream cheese flavor. If you like a super sweet frosting, feel free to add more powdered sugar to taste. (The recipe follows the cupcake one below, so read on!)

If  you bake these, I would love to hear what you think. Happy baking everyone!

For the Devil's Food Cupcakes:
(makes about 24 cupcakes)
1/2 cup (4 oz.) butter
1 1/2 cups cake flour (I used 1c. cake flour + 1/2 cup AP flour to add a little more body to the cakes)
1 tsp. baking soda
1 tsp. kosher salt
1/4 tsp. baking powder
1 cup coffee (I used instant espresso to make it strong)
1/2 cup cocoa powder (I use Valrhona cocoa powder -- well worth the $$)
1 cup reg. sugar
1/2 cup brown sugar
1 tsp. vanilla
2 eggs

Method:
  1. Preheat oven to 350 degrees. Line 2 muffin pans (or bake 2 batches if you only have one tin) with cupcake liners of  your choice. I love to use pretty foil ones when I am baking gifts, so that's what I used here. 
  2. Combine dry ingredients in a medium bowl. Whisk or sift and set aside. In another medium bowl, whisk the coffee and cocoa powder until smooth; set coffee mixture aside.Cream butter and sugars until smooth. Add vanilla and eggs and continue to beat until light and fluffy. Alternately add the flour mixture and the coffee mixture, beating to combine after each addition. Try not to overmix.
  3. Measure or scoop the batter into each liner so that they are filled no more than halfway (cupcakes will rise quite a bit).
  4. Bake until a toothpick inserted into cake comes out clean, about 20-25 minutes. Transfer to a wire rack and let cool completely.
For the Peanut Butter Cream Cheese Frosting:
1 8oz. package cream cheese
1/2 cup (generous) peanut butter (I love Skippy Creamy PB)
1 t vanilla
2 1/2 cups powdered sugar
2 T whole milk or half and half

Method:
  1. Beat cream cheese until soft.
  2. Add peanut butter and vanilla. 
  3. Add the powdered sugar and milk alternately.
  4. Beat on high until smooth and fluffy. You may have to stop and scrape down the sides of your mixture to get any stray sugar or cream cheese clumps. If the frosting is still too thick, feel free to add more milk, 1 T at a time.
  5. Frost as desired! (I like to pipe the frosting onto the cupcakes using a pastry bag and either a plain, round tip or a french tip).
The cupcakes can be kept at room temperature for a few hours, but anything beyond that, they should be refrigerated.
(Cupcake recipe is adapted from Saveur).

Wednesday, August 5, 2009

Brown Sugar Cookies Are Underrated!

I have to say, I love the sugar cookie. I remember a few times in high school, my friends and I would go out and buy a tub of refrigerated Sugar Cookie Dough and demolish it. Yum.

Well, these days, after some time in commercial kitchens, I'm happy to say that my palate has become a bit more refined. Brown sugar is one of my favorite ingredients to bake with -- it's flavor profile so much more delicious and complex than regular 'ole sugar. Maybe it's just me, but I feel like the molasses and nutty tones of brown sugar enhance any pastry (and it tends to keep longer).

That being said, Brown Sugar Cookies might be my favorite kind of cookies. That's kind of a big deal for me. Anyway, after baking up a few batches a few days ago, I thought I would share my recipe with you. These cookies go great with summer fruits -- both berries and stone. They also make wonderful ice cream sandwiches. No matter how to eat them, I can promise you this: you are going to love them.

Annie's Brown Sugar Cookies
** This recipe makes a ton of cookies -- it can easily be halved, or I would bake half and refrigerate the rest. The dough keeps well for a few days this way.

Ingredients:

7 oz unsalted butter, divided (5 oz browned, 2oz cold)
1/4c. sugar
2c. brown sugar (I usually use light, but you could make these even better by using 1c. dark and 1c. light)
1 egg + 1 yolk
1T + 1t vanilla extract (I sometimes use about 1/2 of a vanilla bean if these are for a special occasion)
10 1/2 oz. AP flour
1/2t baking soda
1/4t baking powder
1t salt (I like to use Kosher salt)


Method:
1. Preheat oven to 325.
2. Cream butter and sugars until fluffy. Add the egg & yolk slowy and then beat on high until light and mousse-like. I find that really whipping the eggs adds a lot of volume to these cookies. Add the extract. Mix until well incorporated.
3. Combine dry ingredients. Either whisk together or sift and with mixer on low, slowly add to wet ingredients. Mix until just combined (don't overmix or the cookies will toughen up)
4. Use cookie scoop or spoon to evenly place dough on silpat or parchment-lined sheet pan. These cookies will spreada bit, so give them some room.
5. Bake for about 15-18 min. I always say, bake them "until they are done." That means different things to different people. I like these underbaked, so about halfway through, I turn them and then take them out when they look juuuust underbaked. They will come out soft and billowy, but will flatten and settle once they're cool.
6. Cool them for about 10 min on the pan and then move to a wire rack to cool completely.
7. ENJOY!

Let me know what you think of these! I love to get feedback, so comment or RT on twitter. Thanks!